
Lesson 1
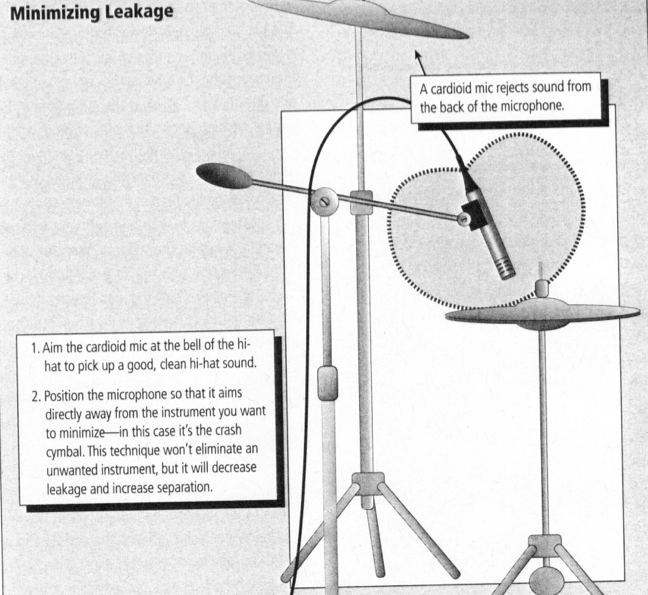
Introduction To Apple's Logic
Learning About Logic
Logic is a software program that allows you to edit, record, mix, and master digital audio and MIDI files on your Macintosh computer. The program uses nonlinear hard disk recording (unlike tape recorders, Logic allows you to go immediately to any spot in a recording without having to rewind or fast-forward.), and nondestructive digital editing (An editing mode in Logic where the original recorded material is not altered).
Getting Started
Installing Logic
If you own a copy of Logic with documentation, please be sure to read all the documentation on how to best install your Logic software and hardware.
This Course Assumes That You Are Using Logic Pro X . If you are not, you will need to upgrade to Logic Pro 9. This course also assumes that you have set up your audio interface and have a MIDI keyboard connected to your computer.
Understanding Signal Flow
Now that your studio is set up, you really need to understand how audio signals travel through your studio gear. This is called signal flow. Signal Flow is a very important concept. It will help you to understand how your studio works, and also help you to correct any problems that may occur in your studio.
When you sing, you create an acoustical sound wave that pushes air.
Sound is simply a vibration in the air. Sound waves travel outward in all directions from the source of the sound. Our ears then pick the waves in the air and our brain interprets the compressions in the air.
A vibration occurs over a single wavelength. Frequency is a measure of how many vibrations occur within the time span of one-second or when a wave progresses through its crest and trough and starts over again. This is measured in Hertz (abbreviation Hz) and is a direct correlation to sound. In music, a pure sine wave of 440 Hz is the note A on the fourth octave of the piano.
Amplitude is a measure of the amount of energy in a waveform, or the amount of air being moved by the wave. Amplitude is indicated by the height of the crest and the depth of the trough of a waveform as represented in the graph below. Amplitude refers to loudness and is measured in decibels (db).
As a wave, sound has two main components: frequency and amplitude. The higher the frequency, the higher the pitch. A frequency ratio of 2:1 is called an octave.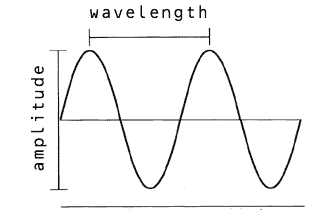
If your hearing is working correctly, you should be able to hear from 20Hz to 20,000 Hz or 20kHz.
Below is a guide to some of the more common frequencies in the music world.
Low bass (20 to 80 Hz) includes the first two octaves. These low frequencies are associated with power and are typified by explosions, thunder, and the lowest notes of the organ, bass, tuba, and other instruments. Too much low bass results in a muddy sound.
Upper bass (80 to 320 Hz) includes the third and fourth octaves. Rhythm and support instruments such as the drum kit, cello, trombone, and bass use this range to provide a fullness or stable anchor to music. Too much upper bass results in a boomy sound.
Mid-range (320 to 2,560 Hz) includes the fifth through seventh octaves. Much of the richness of instrumental sounds occur in this range, but if over-emphasized a tinny, fatiguing sound can be the result.
Upper mid-range (2,560 to 5,120 Hz) is the eighth octave. Our ear is very particular about sound in this range, which contributes much to the intelligibility of speech, the clarity of music, and the definition or "presence" of a sound. Too much upper mid-range is abrasive.
Treble (5,120 to 20,000 Hz) includes the ninth and tenth octaves. Frequencies in this range contribute to the brilliance or "air" of a sound, but can also emphasize noise.
Sounds below 20 Hz are infrasonic; sounds above 20 kHz are ultrasonic. There is much debate on how frequencies in these ranges affect hearing.
If you sing into a microphone, the mic will detect the sound wave and transform (transduce) that acoustical sound wave into electrical current. The electrical current is an “electrical picture” of your voice’s sound wave.
The electrical current travels through the microphone cable, then into a mic preamplifier. The mic preamp amplifies the current to a higher volume level called “line level”. Line level is the standard level for all recording equipment. From the mic preamp, the current is then directed to an input on your mixer or audio interface.
When you are recording in Logic, the audio current must be converted to digital data (remember the 0s and 1s!), so that your computer can record the sound wave data and store it on your hard drive. The analog-to-digital conversion usually takes place on your computer or other device containing an A/D (analog to digital) converter.
Here is a simple explanation on how analog waveforms are converted to digital: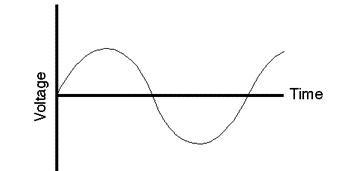
An analog waveform now represented by voltage.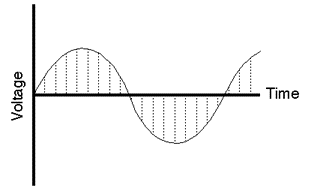
The first step in digitizing an audio waveform is to slice it up into moments in time, a time sample is taken at each vertical dotted line.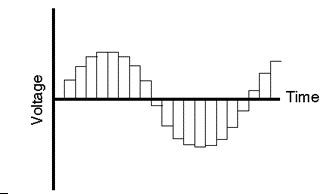
This is what the sample looks like after it has been digitized. Notice that we still have the basic shape of the waveform, but the smoothness has been lost.
The goal is to represent the signal with a string of numbers that represent measurements of each sample.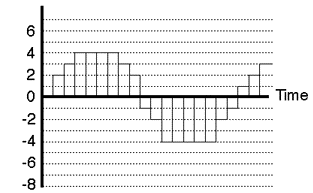
Next, the signal is quantized, because a computer can’t think in subjective terms. We have to fit this into the binary language. The higher the quantization level, the more accurate the picture. A grainy photo would represent a low quantization level. A clear photo represents a high quantization level. A CD has 65, 536 possible levels that it uses when measuring an audio signal.
Your signal will now be processed by Logic and loaded as a track, or it may be routed through a bus in Logic's virtual mixer.
Once you have your signal in Logic and on the hard drive, it is edited, processed, sent back out through Logic's mixer, converted back to an analog current, and sent to your speakers.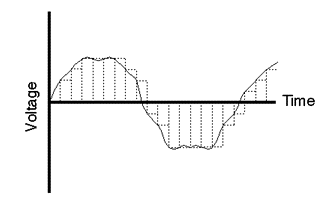
Now that all those digits are stored on your hard drive, we have to turn it back into a sound wave so you can hear it. This is the wave now being turned back into voltage.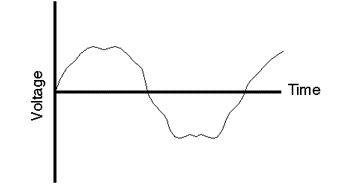
This is what is sent out of your system. There are other things that have to be done to the wave, but I just want to give you a basic idea of the process.
Anti-Aliasing
Some sounds carry frequencies that our ears can’t detect. For example, the ringing of a crash cymbal contains frequencies above 20 kHz that a human ear can’t detect.
If we are sampling at a rate of 44.1 kHz (CD sample rate) those high frequencies are cut off and a new waveform is created without those high frequencies called an alias, or a false identity. This alias frequency creates a distortion of the sound if it is left in there. The cymbal sound will be distorted. Imagine all of the sounds that carry frequencies that we can’t hear. If sampled at 44.1 kHz there will be a lot of distortion on the samples.
So, the solution is to filter out any frequencies above 20 kHz (the limit of our hearing range) so they don’t get aliased. This is called anti-aliasing.
A Low Pass Filter, which allows only frequencies below a certain range to pass through, is inserted into the signal path before the sound is sampled and digitally converted.
The low pass filter can’t really kick in right at 20 kHz so there is a margin of several thousand hertz for the filter to kick in all the way. With a sample rate of 44.1 we have an extra 4.1 or 8 kHz to play with above the 40 kHz mark. We won’t miss the sound of the filtered out frequencies because our ears can’t detect them anyway. Now the sampled sound will not be aliased, and more importantly, it won’t be distorted. The sound will be clean.
Logic's Sound and Memory Requirements
Sound files and audio samples take up a lot of space on your hard drive. The higher the sampling levels the more space! Many software-recording programs now allow for higher sampling levels well above 44.1 kHz. This is great, but remember that it takes up a lot of room on your hard drive and, if you want to burn your music to CD higher sampling rates will have to be converted back to 44.1 kHz (more on that later).
Let’s look at an example of how much hard drive space audio files eat up!
24 tracks of audio, a 5 minute song, 24 bit depth, 44.100 sample rate will work out to be about 7, 620, 480, 000 bits.
In simpler terms, about 908 MB, or almost 1 Gig on your hard drive.
You can do the math for about 10 songs, or a CDs worth of music. I hope you have a large hard drive!
I will discuss some memory saving tips for getting that number down later in the course.
Wow! That is a lot to digest, especially since all of this happens in the blink (or two) of your eye.
Gain Structure
A gain structure is a flow chart that shows you how your audio signal is routed before it gets onto your hard drive and into Logic. This includes any amplifier (or attenuator) that affects the level of your audio signal. Any time we pass an audio signal through a piece of equipment, we are adding noise to the signal. Let’s look at a gain structure on a standard mixer set up.
Plug the microphone into a mixer, and the signal passes through a mic pre-amp that is controlled by a “trim” or Gain” knob.
The signal now passes through a mixer channel controlled by a fader.
The signal may now be routed through the master fader, a sub-mix bus, an aux bus, or a control room/headphone mix. The audio signal really can travel a long way before it comes back out again.
If you understand how signals flow in your studio, you can help you to get optimal recording levels through all of your gear.
The rest of the gain stages can be controlled in the Logic's Mixer. If you are using an audio interface, the input gain stages are controlled by the rotary knobs or faders on the device.
Take the time to find out how you can monitor your input gain stages by using one of the methods mentioned above. Each software installation will be different.
Setting Up MIDI and Audio Devices
Watch The Following Video:
Setting Up MIDI and Audio Devices on a Mac
Hearing Test
Logic Project 1 :
Describe the Gain Structure in your home setup or the PSU Recording Studio for Workstation #3 or #4. Include any microphones, or other input devices that may be going into this Logic set-up. Also tell us how you control the input (microphone) gain.
Recap: Lesson 1
This week we spent some time learning basic audio concepts. You should have a better understanding of:
Basic Signal Flow
Waveforms
Amplitude
Frequency
Analog to Digital Conversions
Anti-Aliasing
Memory Requirements for Audio
Gain Structure
Lesson 2
Getting Started With Logic
I am assuming that you have Logic installed on your Mac and that you have your audio interface and MIDI keyboard set up and working correctly. If not, please refer to the Logic manual for more information on how to set up and configure your audio and MIDI keyboard.
Watch The Following Videos:
Video 1 (Launching and Configuring Logic)
Video 2 (Adding a Software Instrument)
Video 3 (Adding an AU Software Instrument)
Video 4 (Saving a Project)
Video 5 (Adding Multi Timbral Instrument Tracks and Recording)
Logic Project 2:
Experiment with Logic's Software Instruments (also known in the rest of the world as Virtual Instruments or VIs)
Set up 3 different software tracks with 3 different sounds.
Chapter 2 Recap
You should now be more familiar with:
Creating a new Logic project
Adding software Instruments
Saving a Logic Project
Inserting a software instrument into a Channel Strip
Auditioning different sounds within Logic
Record-enabling an instrument track.
Lesson 3
Watch The Following Videos:
Video 7 (Apple Loops)
Logic Project 3:
Record an eight bar loop using any Apple loop that you want.
Watch The Following Videos:
Video 8 (Logic’s Transport Controls)
Video 9 (Basic Recording)
Logic Project 4:
Just like I demonstrated in Video 9, record a MIDI piano or other Software Instrument track along with a drum loop. It does not have to be long, eight-measures will be just dandy!
Chapter 3 Recap
You should now be more familiar with:
Adding loops to your Logic Project
Extending loops
Working with Logic's Transport Controls
Working with Software Instruments
Setting up a recording Cycle
Configuring your metronome
Changing the tempo of a Logic sequence
Recording a MIDI and Audio track using a click track or metronome.
Lesson 4
Time Signatures and Tempo Changes
Watch The Following Videos:
Video 10 (Changing Time Signatures)
Video 11 (Creating a Sudden Tempo Change)
Video 12 (Creating an Accelerando)
Video 13 (Creating a Ritard)
Logic Project 5:
Create a new Logic Project with at least two tempo changes that include an accelerando and ritard!
Watch The Following Video:
Video 14 (Customizing Logic)
Chapter 4 Recap
You should now be more familiar with:
Adding multiple time signatures
Creating multiple tempo mappings
Using the pointer, pencil, and eraser tool
Creating an Accellerando
Creating a Ritard
Using Lists to create tempo changes
Using Lists to create tempo curves
Customizing your Transport Bar
Customizing your Metronome
Working with Master Level Control
Lesson 5
Watch The Following Video:
Video 15 Recording Takes
Logic Project 6:
Create a new Logic Project and record at least 3 takes using cycle record, a software instrument, and the Takes Folder.
Step Time Recording In Logic
Step time recording is a method for recording MIDI (software instrument) tracks without having to play with a click-track in real time. It is especially useful for recording difficult passages that you could not perform in real time.
The step-time method that I am going to show you involves entering notes in the Score or Piano Roll editors by clicking in a note using the Pencil Tool.
Note: when you use this method you are going to have to edit the MIDI data so that your performance will have a more "human" feel. This will also be addressed in this week’s lesson.
Watch The Following Video:
Video 16 Step Time Recording
Logic Project 7:
Create a new Logic Project and enter in the following melody using a piano software instrument. 
Watch The Following Videos:
Video 17 Editing Velocities
Video 18 Dynamic Envelopes with HyperDraw
Video 19 HyperDraw in Score Window
Logic Project 8:
Create a new Logic Project and enter in a 4 bar melody using any software instrument. Create a dynamic envelope using the Pencil tool in the Hyper Draw window.
This Concludes Lesson 5
Lesson 6
Logic's Software Instrument Inspector
Watch The Following Videos:
Video 20 Logic’s Software Instrument Inspector
Video 21 Editing Velocity with the List Editor
Video 22 Editing MIDI Notes in the List Editor
Video 23 Quantize
This allows you to set a Quantize value when you are recording. This is especially useful for entering percussion parts, where you want the timing to be locked in.
For an explanation of Quantize, click on the link below:
Quantize
Watch The Following Videos:
Video 24 Brillant Pianist?
Video 25 Looping a Region
Working With Automation
One of Logic's main features is that it allows you to create an automated mix. This is especially useful for creating professional mixes and having the ability to change audio effects in real time. In the past, the audio engineer would be assigned this task, but in today's world, it is now required that composers have the ability to do this so they can present a final mix to a client.
Watch The Following Videos:
Video 26 Automation
Video 27 The Mixer Window
Logic Project 9:
Create a new Logic Project and use an audio loop (Blue) or one of your own audio recordings. Have at least two audio tracks and put in some volume automation.
Lesson 7
Working With Third Party AU Software Instruments
Logic also allows you to use third party software instruments such as the Kontakt Sampler or Garritan virtual orchestra. There are a whole host of third party software instruments on the market. These are called Instrument Plug-ins and are accessed through something called Audio Units or AU Instruments.
Watch The Following Videos:
Video 28 Loading a Third Party AU Instrument
Video 29 Configuring a Multitimbral AU Instrument
Video 30 Creating a Multitimbral Kontakt Instrument
Video 31 Creating a Template in Logic
Video 32 Multitimbral MIDI Outputs
Video 33 A Brief Kontakt Tour
Link to Native Instrument Free Players and Instruments
Logic Project 10:
1. Create a new Logic Project and set up at least 4 Multi-timbral software tracks using Garritan Instant Orchestra. Label your tracks. Load in 4 different instruments/patches from Garritan.
2. Create a new Logic Project and set up at least 4 Multi-timbral software tracks using Kontakt. Label your tracks. Load in 4 different instruments/patches from the Kontakt Sound Library.
Watch The Following Videos:
Video 34 MIDI Editing Part 1
Video 35 MIDI Editing Part 2
Video 36 MIDI Editing Part 3
Editing Velocity
Velocity is measured by how hard you strike a key on your piano keyboard. It is measured from 0-127. You can think of velocity as volume, especially when you are using it to shape a musical phrase.
A rough dynamic breakdown of velocity (0-127) is as follows:
p = 0-55
mp = 56-88
mf = 89-108
f = 109-127
Remember that the above values are subjective in that the patch (sound) that you are using may not respond to the above values. For example, a xylophone patch will not be as velocity sensitive as a violin patch.
Watch The Following Videos:
Video 37 Creating a Crescendo in the Events List
Video 38 Editing Velocities With Piano Roll
Video 39 Editing Velocities Using The Score Window
Video 40 More MIDI Editing in the Piano Roll
Logic Project 11:
Create a new Logic Project and record the following with a piano sound. Make sure that your velocities (volume) match the notation.

Lesson 8
Changing Software Instruments And Loops To Audio
Up to this point we have been working with MIDI data only, not audio. Logic allows you to export an entire project as an MP3, Wave, or AIF file. You can also covert a single Software Instrument track into an audio file.
Wav Files
The Wav format is a PC file format, but can also be read by Macs. I prefer this method for film scoring projects since Wav Files are Timed Stamped.
I will cover this more later in the tutorial when I introduce film scoring techniques. Basically this means that when you import a Wav File into Logic it will contain SMPTE info to place the wav file in the correct location on your movie.
Watch The Following Videos:
Video 41 Bouncing an Entire Project
Video 42 Bounce Regions
Video 43 Creating a Bus Part 1
Video 44 Creating a Bus Part 2
Video 45 Creating a Bus Part 3
Lesson Download Files:
Lesson 8 Percussion Files
Logic Project 12:
Create a new Logic Project and create a percussion mix similar to the videos above. Use the Lesson 8 Percussion Files audio loops and bounce your mix down to a single stereo Aux/Bus track titled Drum Mix as demonstrated in the lecture videos.
Lesson 9
Basic Audio Editing and Recording
We have already addressed MIDI editing earlier in this tutorial and in many ways editing Audio Regions in Logic is quite similar. The following tutorials will show you just enough to "get the job done". But editing audio is an ongoing learning process and I encourage you to use Google, ask questions, and learn, learn, learn!
Watch The Following Videos:
Video 46 Basic Audio Editing Part 1
Video 47 Basic Audio Editing Part 2
Video 48 Basic Audio Editing Part 3
Video 49 Recording Levels
Video 50 Flex Pitch
Lesson Download Files:
March To the Gallows Vocal
Logic Project 13:
Create a new Logic Project and add a couple of audio tracks. These could be loops, or recorded tracks. Add some Volume, Pan, Mute, and Solo automation to the tracks.
Lesson 10
Setting Up An Effects Bus
While you can put an effect on each channel strip in the Mix Window, you would quickly use up your computer's RAM and resources. There is a better way to send an effect to multiple channels using a Bus.
Watch The Following Videos:
Video 51 Setting up an FX Bus Part 1
Video 52 Setting up an FX Bus Part 2
Video 53 Adding an FX to a Single Track
Lesson Download Files:
Lesson 8 Percussion Files
Logic Project 14:
Create a new Logic Project, download the Lesson 8 Percussion Files (link above) and recreate what was covered in Videos 51 and 52.
Make sure that you clearly label all tracks.
Using Auto Punch
There may be times when you are recording that you want to record several takes in a single session and then go back and select the same take. Or, you may want to simply replace a bit of audio on a recorded take. This is where you would use Auto Punch in Logic.
Watch The Following Videos:
Video 54 Autopunch Part 1
Video 55 Autopunch Part 2
Reverb Basics
You are going to find that as a composer you will probably have to do audio engineering as well. Most of the clients that you work for will not have the extra funds to hire a composer and an audio engineer. You are going to have to wear two hats!
The effects that come with Logic are among the best and most complicated plug-ins that are available. Having said that, they are very complex and you will need to spend time with them, experiment, and let your ears be the final guide. Audio engineering is an art, not a science. There is no set formula for getting that next great mix or sound. Your ears will always have the final say.
The function of reverb is to create a space around a sound in a controlled acoustical environment. Here is a list of the most common reverb spaces:
Large hall This is typically a concert hall where symphony orchestras perform. Examples in the "real" world include Symphony Hall in Boston and Carnegie Hall in New York.
Small Hall Usually around 2000 square feet and is typically a recital hall where chamber groups would perform.
Stage This can be thought of as a stage in a night club and is typically 20-30 feet.
Room This can be any room where of about 30-50 square feet. It may also be somewhat "dry" sounding. These also include bathrooms, which can contain a lot of reverb!
Studio Technology now allows us to emulate the sound of the rooms in major recording studios. These typically come in three sizes.
Studio A for large groups such as orchestras used for Hollywood film stages.
Studio B for smaller ensembles and pop type groups.
Studio C for smaller more intimate groups
Cathedrals emulate the reflections typically found in larger stone cathedrals found in Europe such as Notre Dame in France. Typically used for larger groups or large choirs.
Reverb Applications In Logic:
Mix- this lets us choose a balance between Wet (with reverb) and Dry (no reverb). The default is usually 100%. I usually start at about 20% and use my ears to dictate the proper amount. Simply grad the slider and move it up/down to change the Mix Value
Pre-delay allows you to determine when you hear the reverb start to work. The lower the number the faster you will hear the reverb start to work. Again, experiment with this setting as it is going to vary from instrument to instrument.
Initial delay this is not available on all reverbs. This adjusts the placement of the dry sound in relation to the time it enters. A longer initial delay will allow the dry sound to enter later in time. Again, you need to experiment with different instruments.
Reflectivity this defines how much reflection there will be off the walls, ceiling, and floor of the sampled reverb room. In the "real" world walls etc will be made of different materials such as, plaster, stone, carpet, glass etc. These have a dramatic effect on the sound of the reverb. You have to experiment to find the Reflectivity setting that sounds the most natural to you.
Density/Time This determines the density of the reverb and the duration of the reverb. As with all the other settings, there is no hard and fast rules-use your ears!
Presets The engineers at Apple have put together some great presets for all of the effects in Logic. We can learn a lot from these Presets.
Watch The Following Video:
Video 56 Basic Reverb Controls
Lesson Download Files:
Dry Vocal for Reverb
Cheat Sheet for Reverb Parameters
Compressor Basics:
You can think of a compressor as an automated mixing board that levels out the dynamic range of a sound or track so that the sound is uniform and does not jump up and down in your mix.
There are Five Basic Controls:
Ratio- This is the first step in the compressor set up and can be thought of as input level to output level. This is typically measured as a ratio. For example, a 3:1 compression ratio indicates that only 1/3 of the signal is output and so on. This, in effect, smoothes out your audio output signal so you can better control the sound in the mix. 3:1 and 7:1 compressions are the most natural sounding. Again, let your ears make the final determination as to the best ratio.
Attack and Release (or decay) This should be your second step when setting up a compressor. Usually a good starting place is an attack time of around 1ms and a release time between ½ to 1 second. Let your ears make the decision.
Threshold should be your last setting. This is the amount of Gain Reduction that will be applied to your track or sound. Once a sound hits the Threshold level the compressor will start to work. Be very careful when setting this level, usually 3dB to 6dB will get the job done. Let your ears make the final decision.
Gain This will turn up the volume of the entire signal. This is how you get a signal "hotter" in the mix. Be very careful not to over compress your mixes. Let your ears be your final guide.
Watch The Following Video:
Video 57 Basic Compressor Controls
Lesson Link:
A Beginner’s Guide To Compression
Lesson 11
Drummer And Drum Kit Designer
Drummer and Drum Kit Designer
I have a confession to make. Logic’s Arrange Window, which I have been referring to throughout the entire tutorial is now called
Wait for it….
The MAIN Window!
I know, not very exciting, but just thought that I would share that bit of geeky info with you.
Anyway, on to what I consider to be one of the most exciting new additions to logic X.
Watch The Following Videos:
Video 58 Drummer Part 1
Video 59 Drummer Part 2
Video 60 Drummer Part 3
Having Your Drummer Follow a Bass Line or Other Instrument
Logic also allows a drummer to follow another instrument.
Rather than write this out, watch the video on how to set this up:
Video 61 Drummer Part 4
Populate With Drummer Regions
If your selected drummer is still not getting the groove a feel that you think he/she should, before you fire them and try
a new drummer, watch the following video tutorial:
Video 62 Drummer Part 5
Automating Drummer Regions To Change How Your Drummer Performs a Groove
With Drummer, you can spit a performance into as many regions as you like and change the way a drummer plays from
region to region. In essence you are automating the drummer’s performance. To see how this is done, view the following
video tutorial:
Video 63 Drummer Part 6
Using The Drummer Editor
With drummer you can also automate which drums are being played in specific regions. Watch the following tutorial:
Video 64 Drummer Part 7
Adding Fills with Drummer
Video 65 Drummer Part 8
Changing The Drums in a Drum-Set
Video 66 Drummer Part 9
Configuring Multi-Outs for Mixing and Effects on Each Drum
This is so easy to do, that it should almost be illegal!
Video 67 Drummer Part 10
Turning Audio Drummer Tracks Into MIDI Data
This is also so easy that it should be illegal!
Video 68 Drummer Part 11
Logic Project 15:
Create a new Logic Project with a drummer track playing a Verse, Chorus, Verse form. Label your sections.
Lesson 12
Film Scoring Basics
Film Scoring In Logic
I am going to provide you with a couple of short Movies to import and practice with.
PLEASE NOTE THAT THESE MOVIES ARE COPYRIGHTED AND ARE NOT TO BE POSTED ONLINE!!!!!!!
Click on the link below and save the movie to your desktop.
Movies
SMPTE
First we need to prepare Logic to read the proper SMPTE time code for the movie. Logic now makes this process VERY easy! If you are not familiar with SMPTE time code please click on the link below:
SMPTE
Watch The Following Videos:
Video 69 Film Scoring Part 1
Video 70 Film Scoring Part 2
Logic Project 16:
Provide a short score to one of the movie clips that you downloaded. Have fun with this and don’t worry about being too creative. We will go into great depth and detail on how to compose for film and video games in a later course.
Lesson 13
Drum Conditioning
Drum Conditioning
Now that we've heard the results of some different miking configurations, let's focus on drum preparation and tuning (for recording) and techniques for close-miking the drums. To get good drums' sounds, it's necessary to be familiar with drum tuning and dampening techniques. A bad sounding drum is nearly impossible to get a good recorded sound from. A good sounding drum can make your recording experience much more enjoyable.
If the drumheads are dented and stretched out, cancel the rest of your appointments for the day. You'll be spending a substantial amount of time getting.an acceptable drum sound,
If the drums aren't high quality instruments, there's a good chance that the shells aren't smooth and level, and there's a possibility that the drum aren't even perfectly round. If this is the case, the heads won't seat evenly on the drum shell and there'll be a loss of tone, detracting from the drum sound.
Most major manufacturers offer a decent quality instrument that can sound great on tape if tuned properly. Some drums are of very high quality and consistently, sound great on a recording, and most of the higher priced sets from the major drum manufacturers can sound incredible. The extra cost for the more expensive kits, typically assures you of good solid shells constructed from excellent materials that are perfectly round and have truly flat edges, Those features combined with strong, attractive hardware usually make the extra cost a worthwhile investment.
Often, the difference between a good sounding drum and a bad sounding drum lies simply in tuning. The standard approach to tuning involves: "Tuning the .top head to the tone you want.
Making sure the pitch is the same all the way around the head by tapping at each lug and adjusting the lugs until they all match.
Duplicating the sound of the top head with the bottom head
If the head isn't tuned evenly all the way around, the head won't resonate well. You'll probably hear more extraneous overtones than smooth tone. The Audio Example below provides an example of a poorly tuned tom.
The drum in the second Audio Example is the same drum you heard in first Audio Example with even tension all the way around the head and with the bottom head tuned to match the top.
![]() Audio Examples Toms
Audio Examples Toms
You don't need to be a drummer to get the drums sounding good. You do need to be patient and knowledgeable about drum tuning. It's really not that difficult, but it can take some time to get drums tuned well. If you're a drummer, the single most cost-effective routine you can get into before each session is to have new (or fairly new) heads, on your drums that are tuned evenly.
Some drummers are very meticulous about tuning, placement and the status of their heads and cymbals. That's great. Some drummers aren't so meticulous. As the engineer, you need to be able to get the drums to sound good anyway.
If you own drums or know a drummer who's willing to practice creating drum sounds with you, approach each drum separately and start practicing. Start from scratch. Loosen the heads, then build the sounds you want. Try tuning high, medium and low. There are different theories on tuning. Some say that the top and bottom heads should match in pitch. You will have the best luck if you adjust the drum for even tension all the way around the heads.
Beyond that, some drummers suggest loosening one lug after you've achieved even tension to decrease ringing. I prefer not to use that technique, but some drummers use it successfully. Be adaptable and practice! Nothing will give you a feel for drum sounds like tuning and retuning a real drum.
As you work with each drum, you'll hear the results of the dampening and tuning techniques. On each drum, check the heads for wear. Too many extreme dents can stretch a drumhead, limiting even vibration and decreasing your chances of successful drum recording.
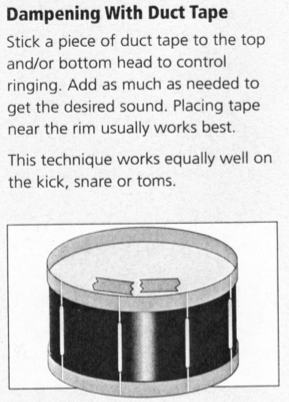
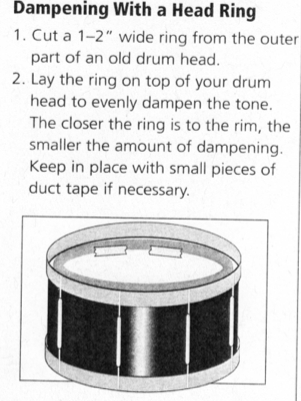
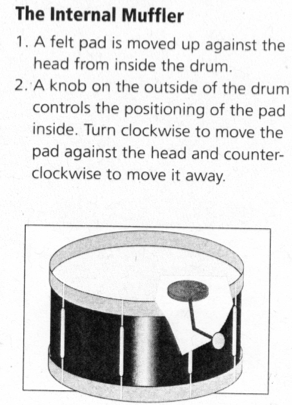
Muffling the Drum
When a drum is tuned well and has a smooth tone, the decay of the drum can last longer than we really want in the mix. If all the toms are ringing all the time, we'll often dampen the heads to decrease the
decay. Some drums played by some drummers might sound great with no dampening. Decisions on the direction for the drum sound are purely based on the needs of the music.
To dampen the drum, we need to put something on the head that'll decrease the vibration. There are several materials that are regularly used to muffle the drum sound.
It's common to use duct tape applied in three to six-inch lengths to the outer edge of the top and or bottom head.
Another technique involves taping bathroom tissue, cotton, or gauze to the head.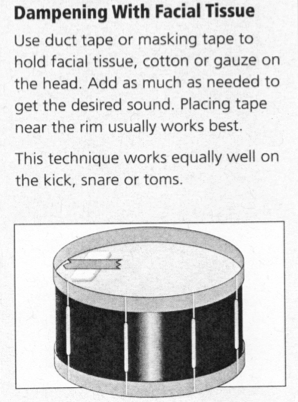
Kick Drum
The kick drum (bass drum) is very important to the impact of the drum sound. Different styles demand different kick sounds. Some sounds, like jazz and heavy rock kicks, have less dampening and ring longer.
Often in the jazz idiom and some hard rock settings, the kick is left un-dampened, but the most common kick sound is substantially muffled, with good low-end thump and a clean attack. To achieve this sound, remove the front head and place a blanket or a pillow in the bottom of the drum. The blanket or pillow should be positioned for the desired amount of dampening—the more contact with the head, the more muffling. The weight of the pillow or blanket affects the sound. I've found that a down pillow works great; I'll usually place a brick or a mic stand base on the pillow to hold it in place.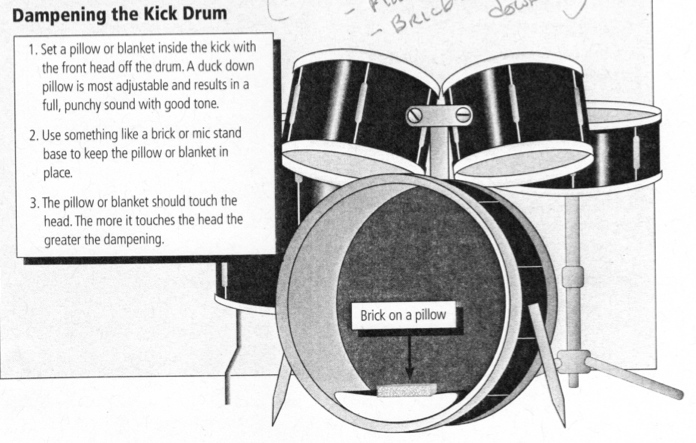
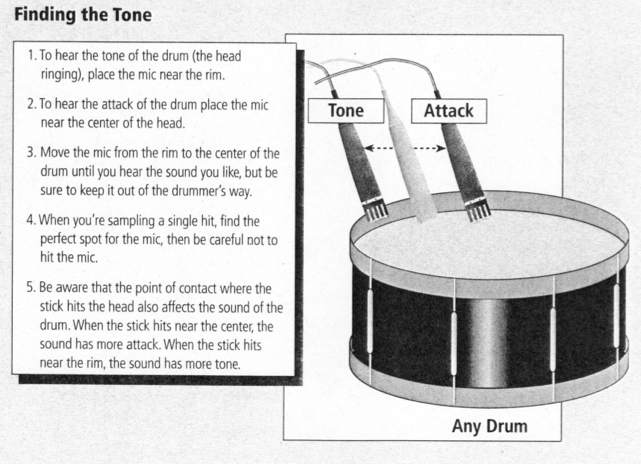
A moving-coil mic, positioned inside the kick about six inches from the drum head and about halfway between the center of the head and the shell, will usually produce a good sound.
Experiment with mic placement to get the best sound you can before you equalize the sound. On any drum, the attack is strongest at the center of the drum, and the tone is strongest toward the shell. Move the mic to the center, To hear the tone of the drum (the head ringing), place the mic near the rim. To hear the attack of the drum place the mic near the center of the head. Move the mic from the rim to the center of the drum until you hear the sound you like, but be sure to keep it out of the drummer's way.
When you're sampling a single hit, find the perfect spot for the mic, then be careful not to hit the mic.
Be aware that the point of contact where the stick hits the head also affects the sound of the drum. When the stick hits near the center, the sound has more attack. When the stick hits near the rim, the sound has more tone.
Positioning is critical to the sound of the drum. Not only is the placement of the mic critical, but the tuning of the drum can make all the difference. The tension should be even around the head and there should be appropriate dampening for the sound you need. It is common to hear a very deep sounding kick that has a solid thump in the low end and a good attack. In search of this kind of sound, most drummers tend to loosen the head to get a low sound. This can be a mistake. If the head is tuned too low, the pitch of the drum can be unusable and might not even be audible. To get a warm, punchy, thump out of a kick try tightening the head.
Another very important consideration in the kick sound is the drummer's technique. Drummers that stab at the kick with the beater can choke an otherwise great sound into an unappealing stutter-slap.
Equalizing the Kick Drum
Always find the microphone, mic placement and tuning that sounds the best on any drum before beginning the equalization process.
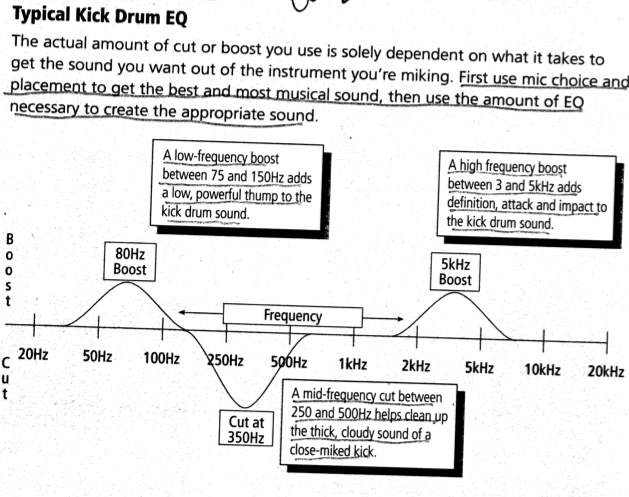
The nature of close-miking a kick drum typically produces a raw sound that is overly abundant in lower midrange frequencies. Between 2OO and 600Hz, and the sound usually needs EQ to be usable.
When I listen to a raw kick sound before it's been equalized, I first listen for the frequencies that are clouding the sound of the kick. That frequency range, is almost always somewhere between 200 and 600Hz.
Effects on the Kick
For a clean and natural recording, the kick hardly ever has any reverb or delay. There are creative uses for almost any technique, but adding reverb to a kick drum tends to make the mix sound muddy. In some styles, though, it's appropriate to add a substantial amount of gated reverb, or reverb that has a very short decay time, to the kick. The Purpose of adding reverb in some R&B and dance styles is to blend the kick with the snare and the toms, which are also heavily effected. Since the decay times are short (below a half-second) the reverb sound is gated, the reverb doesn’t get in the way of the rest of the mix. Reverb on the kick in this setting is musically and stylistically correct and can make an arrangement sound very big.
Wait until mix-down to add reverb. If you're combining the drums to one or two tracks at the time of the initial recording but have a separate mic for the kick, you might need to print the reverb to the multitrack. This will be the only time in the recording process where you'll have access to the kick separately for send to the reverb. This process can work well, but it takes practice and experience to second-guess what the track will really sound like in the final mix.
Snare Drum
Snare drums usually fall into one of two categories: very easy to get a good sound out of and almost impossible to get a good sound out of. Fortunately there are some tricks we can pull out of the hat to help the more difficult drums sound good. It's important for you to know some quick and easy techniques for getting the snare to work. It's amazing how many decent drummers are lost when it comes to drum sounds.
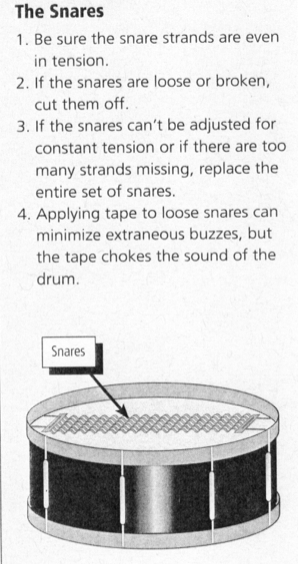
First, make sure the heads are in good shape. A jot of times the top snare head has been stretched and dented so much that the center of the head is actually loose and sagging, even though the rest of the head is tight. This isn't good. Replacing the head will make a huge difference in the sound.
The bottom head is also critical to the snare sound. The most common problem I've seen is a hole in the bottom head. These bottom heads are much thinner than the top heads. Since the drum is continually being put on and taken off the snare stand (which can puncture the head) and usually carried in a case with sticks and drum keys (which can puncture the head) and since drummers tend to set the snare on the floor with the bottom head down (you never know what's on the floor that can puncture the head), sometimes there's a hole in the bottom head. Drummers seem to work on the out of sight, out of mind principle when it comes to the bottom head. When you're trying to get a great sound from a snare, though, it's important .that the bottom head is.in good shape. If it's not, the head won't resonate evenly, and you'll have problems with annoying overtones.
The heads need to be in good shape. If you're doing much drum recording, it is best to have some extra heads on hand. If you have the appropriate replacement head, you'll save yourself a lot of anguish, plus your sounds will be better and you'll get them faster. This will help your reputation in the community. The next time your local music store has a great deal on heads, pick up a 14-inch top and bottom snare head. Most snare drums are 14-inch drums. The most versatile of the top heads are Remo Ambassador coated, and Ambassador Black Dot. After the session, don't forget to get your heads back from the drummer. Experienced studio drummers carry their own extra heads in case one breaks or if a unique musical sound demands a head change.
Practice tuning your own or a friend's drums. Tune the top and bottom heads to the same tone, then evaluate the sound of the drum. Tune the bottom head higher than the top head and evaluate the sound of the drum. Finally, tune the top head higher than the bottom head and evaluate the sound of the drum. See what the sound difference is. There has to be enough tension on the head to give the drummer good rebound, and the tension must be even around the head. With the top head tuned fairly low, the drum sound has a thick texture. This sound can
be very usable in some settings.
The bottom head is also critical to the snare sound. The most common problem I've seen is a hole in the bottom head. These bottom heads are much thinner than the top heads. Since the drum is continually being put on and taken off the snare stand (which can puncture the head) and usually carried in a case with sticks and drum keys (which can puncture the head) and since drummers tend to set the snare on the floor with the bottom head down (you never know what's on the floor that can puncture the head), sometimes there's a hole in the bottom head. Drummers seem to work on the out of sight, out of mind principle when it comes to the bottom head. When you're trying to get a great sound from a snare, though, it's important that the bottom head is.in good shape. If it's not, the head won't resonate evenly, and you'll have problems with annoying overtones.
The heads need to be in good shape. If you're doing much drum recording, it's best to have some extra heads on hand. If you have the appropriate replacement head, you'll save yourself a lot of anguish, plus your sounds will be better and you'll get them faster. This will help your reputation in the community. The next time your local music store has a great deal on heads, pick up a 14-inch top and bottom snare head. Most snare drums are 14-inch drums. The most versatile of the top heads are Remo Ambassador coated, and Ambassador Black Dot. After the session, don't forget to get your heads back from the drummer. Experienced studio drummers carry their own extra heads in case one breaks or if a unique musical sound demands a head change.
Practice tuning your own or a friend's drums. Tune the top and bottom heads to the same tone, then evaluate the sound of the drum. Tune the bottom head higher than the top head and evaluate the sound of the drum. Finally, tune the top head higher than the bottom head and evaluate the sound of the drum. See what the sound difference is. There has to be enough tension on the head to give the drummer good rebound, and the tension must be even around the head. With the top head tuned fairly low, the drum sound has a thick texture. This sound can
be very usable in some settings.
Tuning the snare very high gives a sharp attack and good definition, but the sound can be thin. A medium tuning that's not real high or real low is the most common snare sound.
Mic Choice for Snare Drum
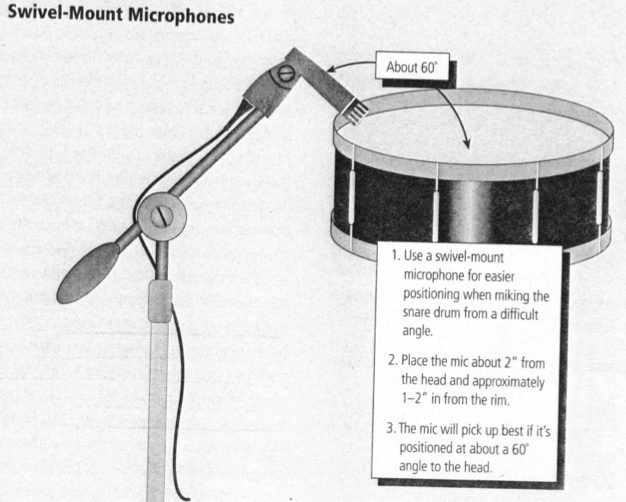
Mic choice and placement can vary greatly depending on the purpose of the recording and the desired musical impact. If you're close-miking a set, the snare mic usually points down at the drum and is about two inches from the top head, aimed one or two inches in from the rim. Use a moving-coil mic like a Shure SM57, Sennheiser 421 or an Electro-Voice RE20. Keep the mic out of the drummer's way because a stick hitting the mic can ruin a take or even a microphone. Most mic manufacturers make microphones that are designed for getting into tight-spots like drum sets. Shure makes the SM56, which is the same mic as the SM57 with swivel mount for the upper part of the mic. These adjustable microphones are very handy and can help you get a better drum sound. The ideal is to point the mic at about a 60 degree angle to the drum., If the mic has to be pointing straight across the drum due to space restriction, there will be more leakage of other drums into the snare mic than you really want to deal with. It's best to point the snare drum mic at the snare drum.
Reverberation on the Snare Drum
Longer reverberation times, in the neighborhood of 1.5 to 3 seconds, are common in ballads of nearly every style and sometimes in commercial pop tunes. A pre-delay in time with the eighth note or sixteenth note can add an interesting dimension to the sound. Many R&B, commercial rock songs, up-tempo country songs and jazz songs utilize^ decay times below one-second. Gated reverb sounds are very common in R&B, funk and dance grooves.
Equalizing the Snare Drum
Most snare sounds don't need to contain an overabundance of the frequencies below 1OOHz. I'll often roll those lows off. To enhance the attack, boost a frequency between 3 and 5kHz. Roll off the lows below 100Hz. Next, I boost 250Hz slightly and finally I boost 5kHz a little up or down depending on the actual snare drum sound you are working with.
Toms
Recording toms is pretty much just like recording the kick and snare. It's important that the heads are in good shape, that they're tuned properly and that the dampening gets the appropriate sound for the track. Tune the top and bottom heads to the same tone and be sure the tension is even around each head.
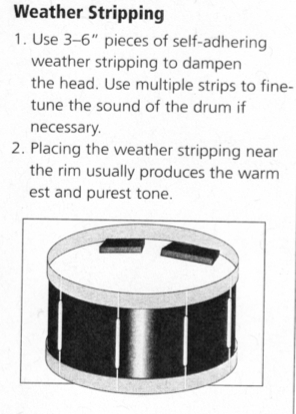
For dampening toms, I recommend weather stripping instead of duct tape or bathroom tissue. Weather stripping stuck on the drum-head provides a warm sound with good tone. The best feature weather stripping offers, aside from the fact that it usually helps you get the best torn sound, is its flexibility. It's easy to remove, reposition and rearrange. You can pull it off easily to shorten a piece, or you can reposition it with exacting precision to tweak the sound and it's as easy to place on the bottom head as it is on the top head.
Some drummers prefer the sound of toms with the bottom head removed. Some drummers always leave the bottom heads on their toms. The trends seem to shift. These are two different sounds. A properly tuned drum with both the top and bottom head in place has a smooth natural tone that is appealing in most musical textures. With the bottom head off, a torn sounds hollow with less pure tone and has slightly more attack. It's hard to beat the sound of a well tuned torn with both heads on, but be flexible and use the sound that fits the musical context.
For close-miking, use a moving-coil mic like a Shure SM57 or a Sennheiser 421. Point the mic at the drum about two inches in from the rim, at a distance of about two inches above the top head.
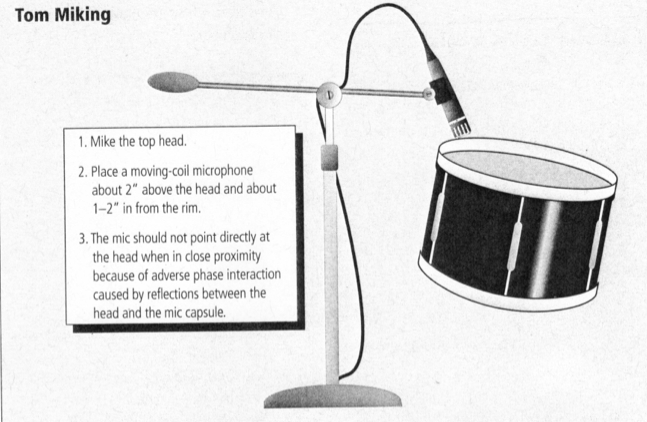
If you want more attack in the sound, move the mic toward the center of the drum, but keep it out of the drummer's way. A miked drum sound has more attack when the microphone is positioned near the center of the drum and more tone when the microphone is positioned near the rim.
Equalizing the Toms
Follow a similar approach to the drums we've covered so far when we EQ the toms. Analyze the lows, highs and mids. There is often a cloudy sound to the lower mids in a close-miked tom.
Reverberation on the Toms
Choose reverb for the toms that blends with the snare sound. It's normal to use the same reverb with the toms as you did with the snare.
If you use another reverb sound, be sure it complements the overall sound of the snare drum. Avoid selecting sounds that indicate completely different acoustical environments unless you're intentionally conforming to a musical judgment.
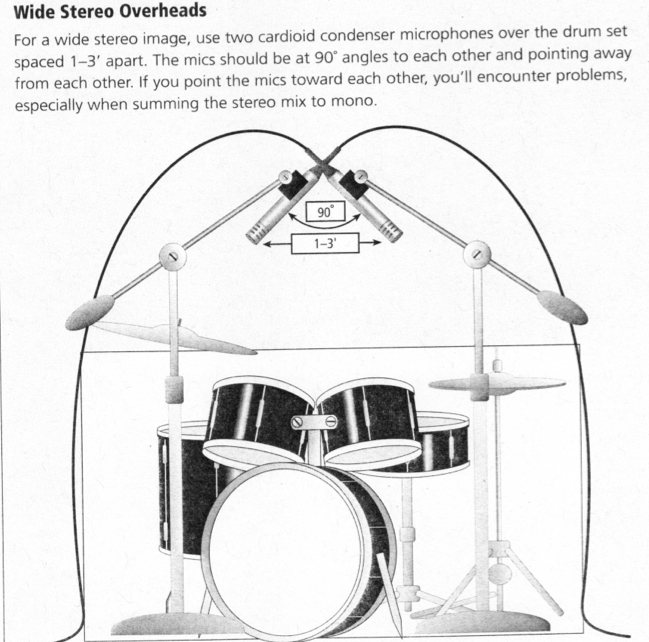
Wide Stereo Overheads
For a wide stereo image, use two cardioid condenser microphones over the drum set spaced 1-3' apart. The mics should be at 90° angles to each other and pointing away from each other. If you point the mics toward each other, you'll encounter problems, especially when summing the stereo mix to mono between 250 and 500Hz. I'll often cut a frequency in this range. The bass frequencies below about 100Hz can usually be rolled off, and the attack of a torn can be enhanced by boosting a frequency range between 3 and 5kHz. I start flat, then cut at about 300Hz. Next, I roll off the lows below 100Hz, then boost the attack at about 5kHz.
Overhead microphones
Once you've positioned the close microphones for the snare, kick and toms, use mics over the drums to capture the cymbals and fill in the overall sound of the drums. It's amazing how much separation we can achieve close-miking the kit. One or two mics over the drums are essential to achieve a blended and natural sound. This will provide the excellent stereo image necessary for a big drum sound and will work well in mono as well.
Click Track
One feature of a professional sounding recording is a solid rhythmic feel that maintains an even and constant tempo. A sure sign of an amateur band and an amateur recording is a loose rhythmic feel that radically speeds up and slows down.
Most drummers need some assistance to maintain a constant tempo. We call this assistance the click track. A click track can simply be a steady metronome pulse, like that from a drum machine or an electronic metronome. It gives the drummer a rhythmic reference to keep the tempo steady.
If a drummer has never played with a click track or a metronome, you might be in trouble if you force him or her to record the track while hearing the click in the headphones. Having to actually follow a steady beat can totally ruin the natural rhythmic feel. The drummer will wrestle with the groove, speeding up to catch the click, then slowing down to wait for the click. This is not good. Sometimes you'll need to simply decide on the lesser of the two evils in the interest of getting the song recorded. If you're consistently working with the same drummer, and they have trouble with a click, suggest practicing with a metronome. Drummers can get very good at locking in to a click track while maintaining a natural rhythmic flow, but it takes practice. And wouldn't you know it, about the time they can play solidly with a click, the drummer's time feel is usually solid enough to get by without a click!
A drum machine is a good source for the click because it offers the ability to change, the sound. Click sounds with good transients work the best because the transient attack unquestionably defines the placement of the beat.
It's very important that the drummer hear the click well, but the biggest problem with a click track is leakage of the sound of the click from the headphones into the drum microphones. It's difficult to deal with a click leaking into the overheads on a quiet or texturally open part of a song. The click has to be at a certain level for the drummer to hear it, but if it's too loud and is audible on the drum microphones, the drum track might not be usable. The solution lies in finding headphones that enclose the drummers ears well enough to conceal click from the microphones. There are many phones available that will perform well. They usually have solid housings and fluid or air-filled soft plastic pads that completely surround the ears.
Conclusion
Recording drums can be fun, rewarding, frustrating, confusing, exciting, encouraging and discouraging. And all of these feelings can happen within a very short period of time, especially when you're learning. Practice the techniques and principles in this chapter. I've used them all many times and they work. When you're comfortable with this information, try other approaches. Personally, I have the most fun when I'm in search of that great new sound recorded in an unconventional way for a creative piece of music. I also know that there's security and confidence in knowing the basics. Learn the basics!
There is no assignment for this lesson. Please go on to Lesson 14.
Lesson 14
Recording Drums and Percussion
The Percussion family
The percussion family contains some of the most interesting sounding instruments. Many of these instruments require special consideration and care when they're being recorded. In this lesson, we'll cover these special considerations, plus we'll look at some common ways to process. the different sounds. Typically when [refer to drums, I'm talking about a drum set which is also called the kit, or the set. The drum set usually includes a bass drum (also called the kick), a snare drum, torn toms and cymbals.
Percussion usually indicates the instruments like tambourine, triangle, cowbell, congas, bongos or shakers. In reality, the percussion family definitely includes the drum set, and the drum set can contain any member of the percussion family. The terms are used loosely, but in a session, the drum track includes the kit, and the percussion tracks contain any percussion instruments other than the kit.
Most people haven't listened enough with analytical ears to decide what they like and dislike about certain drum sounds. They have nothing on which to base their opinions. When considering drum sounds, there are some common characteristics that exist in drum sounds that most of us would call good. The term good is obviously subject to individual opinion. A good drum sound must also be appropriate for the musical style of the song that it's in. Good drum sounds will almost always have:
Clean highs that blend with the mix
Solid lows that blend with the mix
Enough mids to feel punch
Not so many mids that the sound is muddy
Natural sound that possesses a warm tone
Dimension, often sounding larger than life
Believably appropriate reverberation
Balance and blend in the mix
With all of these qualifications in mind, this list of characteristics is worth considering when evaluating and shaping your drum and percussion sounds. Start building your own list of what you think is consistent about good drum sounds.
The most important thing you can do at this point is listen to a lot of different styles of music that have been recorded in a lot of different studios by a lot of different top-notch professionals. Subject yourself to a large quantity of music. Try to be very analytical about the sounds that you're hearing. It's one thing to let the music passively cross your ears, it's another to actually hear what's going on texturally, musically and sonically.
Theories of Drum Miking
We're going to focus on the drum set first. There are a lot of different ways to mike a drum set. I'll outline some of the miking techniques that are commonly used throughout the recording industry. If you listen to the audio examples and practice these techniques yourself, you'll learn what to expect from these different methods, and you'll develop your own opinions about their comparative advantages and disadvantages.
Anytime you're recording drums, it's best to keep the drums and the drummer in a separate room from the recording equipment, so the engineer can hear what the drums sound like as they're going to tape without acoustic interference from the live drums. This scenario is ideal for most recording situations, but in a home studio it's not always possible or practical simply because of the lack of square footage.
If your recording equipment is in the same room with the drums when you're recording it takes a little more time and much more trial and error, but you can still get good sounds. You'll need to record 20 to 30 second of the track, and evaluate the sounds you're getting. Make any adjustments you need to, then repeat this process until you're satisfied with the sound. Once you're satisfied that you're recording a workable sound, start laying down the real thing.
One common arranging trick used to keep a listener's interest in a song involves varying the percussion instruments on each musical section. Often, producers will record all of the percussion instruments throughout a song, waiting until mixdown to decide which percussion part belongs in each musical section. As an exercise in your understanding of the impact of variation in percussion parts, select your ten favorite recordings then, for each recording, chart the order of the verses, choruses, bridge, solos and any other musical sections (like the diagram below). Under each section, list the percussion instruments you can hear along with their panning position. Depending on the specific music you're analyzing, you'll probably notice that one or two percussion instruments are added on the chorus, and possibly the bridge.
See the diagram below: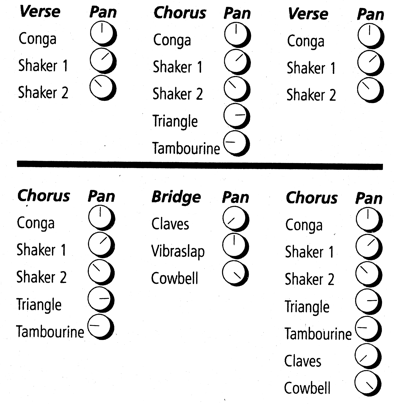
Most of the drum sounds you hear on albums are achieved through the use of several microphones recorded separately to several tracks that are blended and balanced during mix-down. This is ideal Practically speaking, most people don't have a pile of microphones to use at home, let alone 8 to 12 available tracks on the multi-track for drums. Most people have one or two microphones, and these microphones weren't purchased with drums or percussion in mind, but as your setup and skills build you'll want to build your arsenal of task-specific microphones.
You should have a good condenser mic for over the drum set and for cymbals. Condensers are the mic of choice for percussion and they do the best job of capturing the true sound of each instrument. The fact that condenser microphones respond to transients more accurately than the other types of microphones makes them an obvious choice for percussion instruments, like tambourine, shaker, cymbals, triangle, claves or guiro.
The mic of choice for close-miking toms, snare and kick is a moving-coil mic, like a Shure SM57, Sennheiser 421 or Electro-Voice RE20. Though they don't have the transient response of condenser microphones, moving-coil microphones work great for close-miking drums because they can withstand intense amounts of volume before distorting. Also, most moving-coil microphones have a built-in sensitivity in the upper frequency range, which provides an EQ that accentuates the attack of the drum,
If you have access to ribbon microphones, try them on the drums or overheads. They can sound great. They don't have the same excellent transient response as a condenser microphone and they typically don't produce the aggressive EQ edge of the moving-coil, but they can provide some excellent sounds. Be careful! Ribbons are fragile, and if used in a close mic configuration, they'll usually break when hit by a misdirected drum stick.
Most reasonably priced condenser and moving-coil microphones can give you good results. I don't recommend buying the least expensive mic, but you don't have to use a $3000 mic to achieve acceptable results either. Believe me, as you record more you'll start to have favorite microphones for each task. With all things in perspective, there are plenty of microphones available that can act as excellent tools for your recordings.
Recording a Drum Set With One microphone
As we build from the one mic approach to the multiple mic approach, we'll consider techniques that can help optimize each approach. There is definitely something to be learned from each approach and each of these audio examples, so please be diligent in your pursuit of excellent drum sounds.
Mic placement is the main concern when using one mic to record the drums. Where you place the mic in relation to the drums is the primary determining factor of balance between the drums and intimacy of the drum sounds. The amount of room sound that you include in the drum track can totally change the effect of the drum part. The sound of the room that the drum set is in plays a very important role in the sound of the drum track, especially if you use a distant miking technique. Here at PSU we really don’t have a great drum room so you will have to get creative!
The advantage of a small recording setup is portability. If you're using a few microphones. and have a small 4 or 8-track, try moving the recorder and the drums into a warehouse, concert hall or gymnasium. Recording in these larger spaces can give your drum sounds punch, life and character that simply can't be electronically duplicated.

This setup uses a condenser microphone with a cardioid pickup pattern positioned in front of the set, pointed at the set, approximately 6' above the floor.![]() Audio Example Mic in Front
Audio Example Mic in Front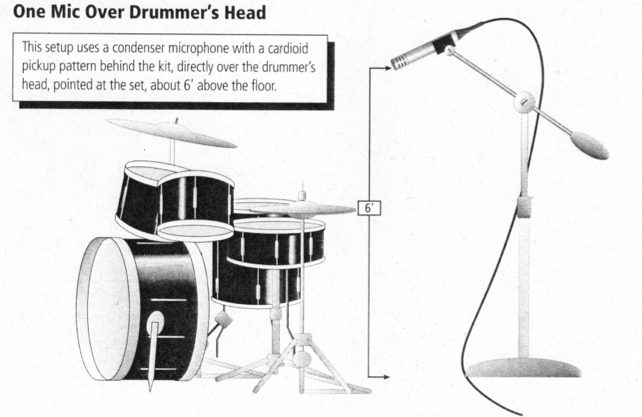
This setup uses a condenser microphone with a cardioid pickup pattern behind the kit, directly over the drummer's head, pointed at the set, about 6' above the floor.![]() Audio Example Mic Over Drummer’s Head
Audio Example Mic Over Drummer’s Head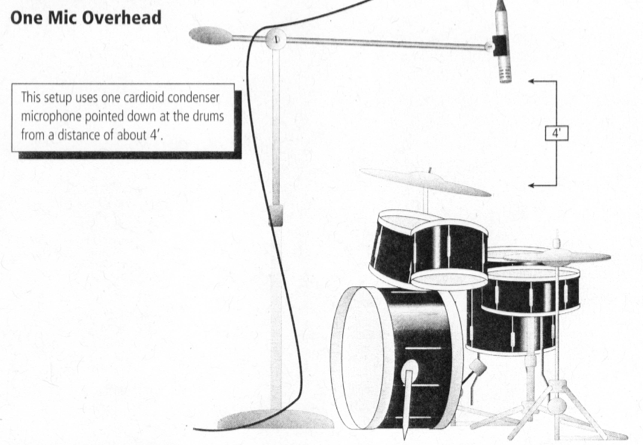
![]() Audio Example Mic Overhead
Audio Example Mic Overhead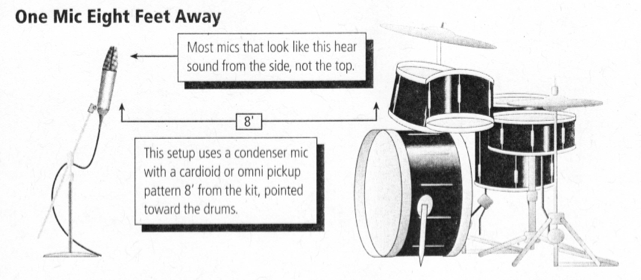
![]() Audio Example Mic 8’ Away
Audio Example Mic 8’ Away
In commercial popular music, we almost always want separate control over the level, EQ and effects on the different drums.
Adding reverb to one mic that's picked up the entire kit will tend to produce a distant sound. The drum set can lose punch and definition. The next audio example demonstrates the sound of one mic on the drum set with the addition of plate reverb with a two-second decay time.
![]() Audio Example with Plate Reverb
Audio Example with Plate Reverb
Each one of these mic positions has a different sound. The difference lies in the amount of acoustic room sound we include as we move the mic closer to and farther from the set.
The disadvantage to using only one mic is lack of control over the individual drum sounds. If we want to EQ the kick separately or put reverb just on the snare drum, we're really out of luck. If we've used just one or two microphones to pick up the entire kit, any effects that are added to the drums are added to all the drums.
Be Mobile
If you have a drum set or a drummer friend who's willing to be a gracious participant, set the drums up and start recording. Record several passes of the same groove. On each new pass, move the mic. Try any placement you can dream up: put the mic under the snare, put the mic in a different room, place the mic very close to the kit or hang the mic around the drummer's neck.
For real fun, move the drums and the mic to a different space, like a garage, a warehouse, a concert hall, the local high school gymnasium, outside or virtually any space that's available and legal.
In each acoustical environment, move the mic to several different spots to record. Keep a written log of which spaces you recorded in, where the mics were placed and how you liked the sound of each environment. Record a verbal reference on your tapes to help document and duplicate your results. Both the written log and the verbal reference and the written log should contain the tape number, take number, location of the recording, mic placement, type of mics, type of drums and the date.
Study your recordings and rate the sound of each. There will probably be a few spaces that sound far better than the others. That's the nature of acoustics. World class recording studios all have great equipment, but one of the biggest considerations involved in choosing a facility for a major project is the acoustic sound of its recording rooms. We are lucky that today we really don’t need a great room! With the invention of reverb and acoustic hall plug-ins, you can even record your set in Disney Hall!
Video 71 Using The Drum Room Template
Drum Recording Assignment #1
Record a drum set with one microphone.
Use any of the above configurations. Make sure that you describe your set up.
Recording A Kit With Two Mics
Let's expand on our single microphone approach to recording drums. You need to build on the knowledge you've gained while using just one mic on the kit. As you add more microphones, your goal is to gain more control over the sounds and have flexibility when equalizing and putting effects on the individual drums.
With two microphones on the set there are two primary options: you can use both mics together in a stereo configuration or you can use one mic for overall pickup while using the other for a specific instrument.
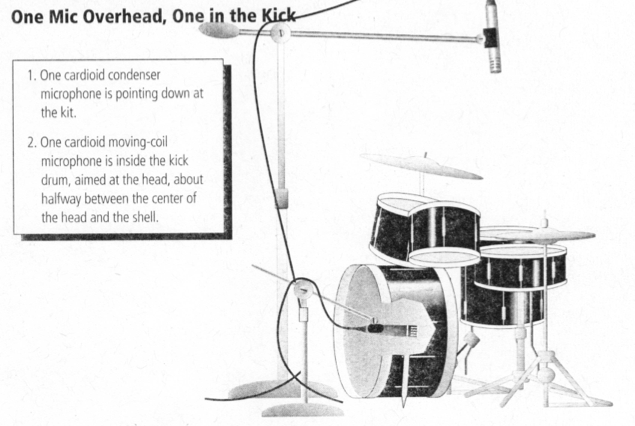
In Audio Example below, I've set one mic directly over the kit with the second mic in the kick drum. When you use one of the microphones for the overall kit sound you can place the second mic on the kick drum (or possibly the snare) to get individual control, punch and definition in the mix. Choosing to close-mike the kick or the snare is purely a musical decision that's dependent on the drum part and the desired effect in the arrangement. This mic setup is more flexible than the single mic technique, but we're still limited to a monaural sound since the kick or snare would almost always be positioned in the center of the mix with the rest of the set.
![]() Audio Example: One Overhead One Kick
Audio Example: One Overhead One Kick
Stereo X-Y
Two condenser microphones are 3' above the cymbals. The mikes are at a 90° angle to each other, pointing down at the drums. With this X-Y configuration, the mic capsules should be positioned on the same horizontal and vertical plane. They should be close enough to each other so that they're nearly touching.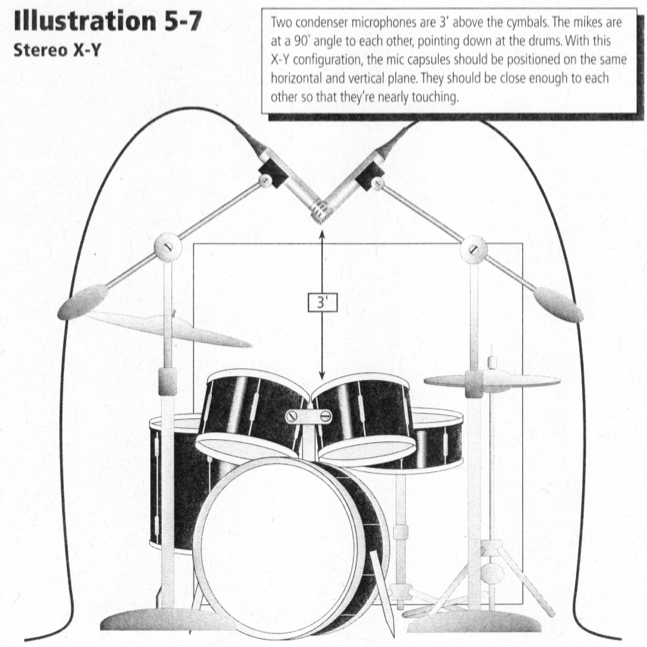
X-Y Mic Technique
The traditional X-Y technique uses two cardioid condenser microphones positioned together to form a 90° angle. The mics should be overlapping and nearly touching.
This is called a coincident mic technique because the capsules are very close to each other and they share the same horizontal and vertical plane.
Coincident stereo mic techniques like the X-Y configuration exhibit the least amount of adverse phase interaction when combined in a mono mix. Since the mic capsules are as close together as they can possibly be without touching*, they hear the sound source nearly simultaneously; they receive the sound waves in the same phase.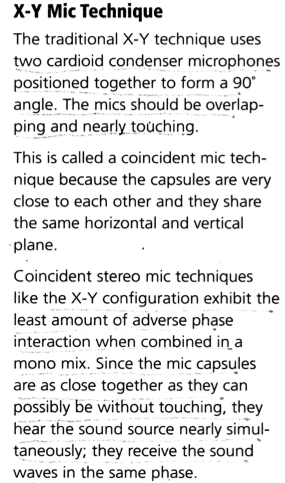
The Audio Example below uses the two condenser microphones with cardioid polar patterns as a stereo pair. The two mics are placed in a traditional X-Y configuration, directly above the drum set, at a distance of approximately three feet above the cymbals, pointing down at the drums. With this configuration, we can get a sound that has a stereo spread. The drums on the left side of the kit will be on the left side of the mix. The drums on the right side of the kit will be on the right side of the mix. If all drums aren't panned center, the mix can be opened up for positioning of the lead vocal and other key solo instruments. As we get into the mixing process, we'll see that positioning supportive instruments away from the center of the mix helps us hear the solo parts that are typically positioned in the center of the mix.![]() Audio Example: Stereo XY
Audio Example: Stereo XY
Try the X-Y configuration from different distances and in different rooms. Stereo mic technique is often the best choice for a very natural drum sound, but for contemporary commercial drum sounds, it lacks flexibility. Stereo mic technique doesn't give you separate level, EQ and effects control on individual instruments. Like the single mic approach, if you put reverb on one mic, you've put reverb on the entire kit. Most commercial music is recorded with close microphones on the individual
drums combined with a stereo pair of mics used in an X-Y or some other stereo configuration.
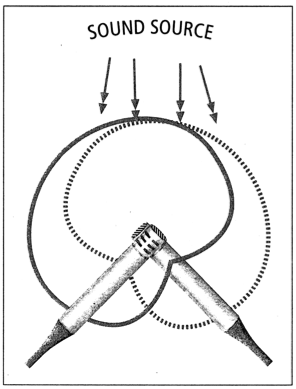
Another good two-mic technique involves placing one mic on each side of the drummer's head, level with their ears pointing forward toward the drums. Position the microphones with their capsules three to six inches from the drummer's ears to achieve a good stereo image. The drummer's skull will act as a baffle between the two microphones. 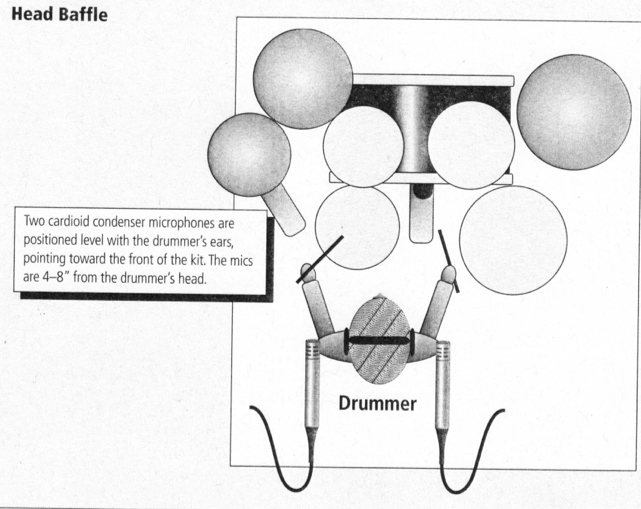
The Audio Example below demonstrates this technique.![]() Audio Example: Head Baffle
Audio Example: Head Baffle
Drum Recording Assignment #2
Record a drum set with two microphones.
Use any of the above 2 mic configurations. Make sure that you describe your set up.
Recording a Kit With Three Mics
If you add one more mic to your setup, you'll usually use one mic on the kick drum, one mic on the snare drum and one mic over the drums. Optionally, you might use one kick mic along with a stereo pair that's positioned over, behind or in front of the kit. Both these approaches have advantages and disadvantages.
If you use one mic on the kick, one mic on the snare and one overhead mic, separate control of the kick and snare is possible. With three microphones, this technique will yield the most commercial and punchy sound. The kick and snare are the two main contributors to the definition of style. Being able to fine tune their level, EQ and effects is an advantage. The drum set in Audio Example 5-9 was miked with one mic inside the kick, one mic two inches above the snare and one mic about two feet above the cymbals. This configuration produces the most commercially viable results so far, but it doesn't provide a stereo image of the set. The kick, snare and overhead are almost always positioned together in the center.
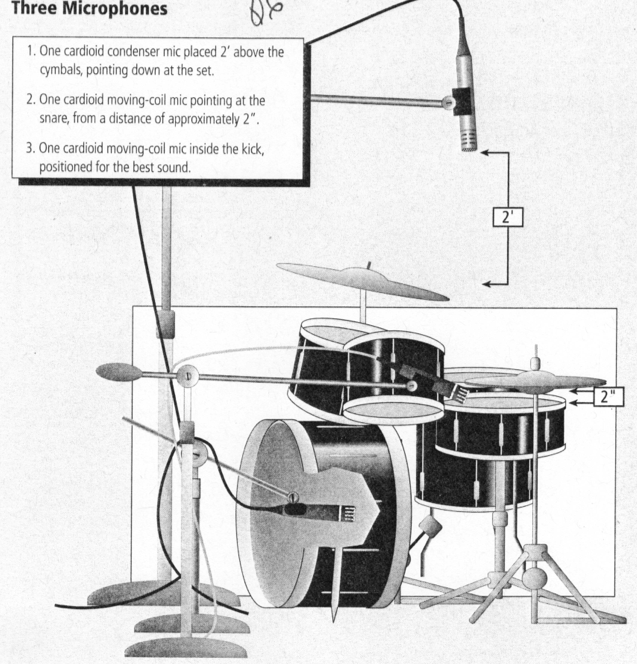
The Audio Example below demonstrates this technique.![]() Audio Example: Overhead, Snare, and Kick
Audio Example: Overhead, Snare, and Kick
If we use a kick and two overheads, we can get a stereo image of the kit, but we lose individual control of the snare. Another option is to put the single mic on the snare instead of the kick, combining that mic with the two overheads. This can be a usable option, but we sacrifice control of the kick. The Audio Example below demonstrates the sound of a drum set with two microphones overhead, in an X-Y configuration, combined with one mic inside the kick.
![]() Audio Example: XY Overhead, Kick
Audio Example: XY Overhead, Kick
Drum Recording Assignment #3
Record a drum set with three microphones.
Use any of the above 3 mic configurations. Make sure that you describe your set up.
Recording a Kit With four Mics
With four microphones on the set, you begin to have good control over the kick and snare sounds, plus you can get a stereo image. Some very acceptable drum sounds can be achieved using a setup with one kick mic, one snare mic, and two overheads. You'll need to experiment with placement of the microphones (especially the overheads), but solid and unique kick and snare drum sounds are possible with this mic technique.

The individual microphones plus the overheads used in a stereo configuration can provide an excellent stereo image. The Audio Example below was miked with one kick mic, one snare mic and two overheads in an X-Y configuration.
![]() Audio Example: XY Overhead, snare, kick
Audio Example: XY Overhead, snare, kick
Drum Recording Assignment #4
Record a drum set with four microphones.
Use the above 4 mic configuration. Make sure that you describe your set up.
As we add microphones to our setup, we can either print each mic to a separate track on the multitrack, or we can do a sub-mix on the mixer, printing the entire kit to one or two tracks. It's ideal to keep as much flexibility as possible for the mixdown, but, if you're using a four or eight track multitrack you'll probably only be able to justify allocating one or two tracks for the drums. Try recording the individual drum microphones on four to six tracks of an 8-track, Then bounce those tracks down to either a mono track or, in stereo, bounce them to two tracks.
As you consider different approaches to drum miking, it's important to note that no one method is always the perfect choice. Part of the fun of recording is in the creative choices we can make musically and technically.
Close-mike Technique
The most common approach to getting good, punchy, drum sounds that have unique character is to use the dose-mic technique^ Each drum will typically have its own mic. Each of these microphones plus two overheads will be printed to separate tracks of the multitrack. These tracks will either stay separate until the mixdown, or they might be combined with the assignment buses and bounced to stereo tracks, making room for more instruments or voices.
If tracks are limited, the microphones can be combined through the mixer to one or two tracks of the multitrack on the initial recording. Simply separately record the kick drum, snare drum, two separate torn microphones and two separate overheads to tracks one through six of the 8-track multitrack. Next, assign playback of those tracks to tracks seven and eight of the multitrack with the channel assign bus. With this setup you can re-equalize each track to obtain the optimum sound quality, add effects to individual drums and blend the drum mix for each musical section. If we want to put a lot of gated reverb on the toms but not on the kick or snare, we can do it using the close mic approach. We have flexibility that isn't possible using one or two microphones. If you're bouncing multiple tracks down to a stereo pair, use the pan controls to set up a stereo mix of the entire kit.
It's possible to use up a lot of tracks once you begin close-miking drums. Most projects using 24 tracks or more can justify allotting 8 to 16 tracks just for the drum set. This isn't an option for most people in their home studios, but be aware that the more isolation you can get, the more precisely you'll be able to shape each sound. There are even plenty of ways to expand on this approach. Try including room ambience microphones, a mic under the snare, individual cymbal microphones or any creative new approach you can dream up.
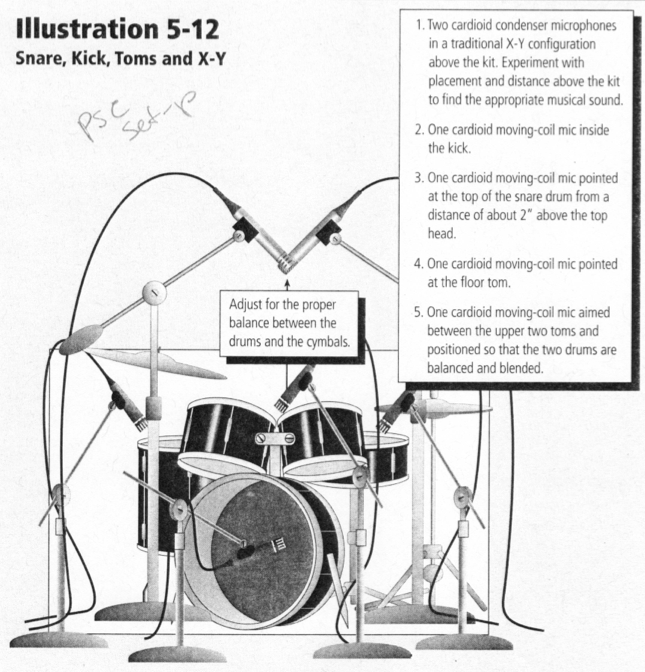
The drum set in Audio Example below is set up with one kick mic, one snare mic, one mic on each torn, two microphones overhead in an X-Y pattern and one hi-hat mic.
![]() Audio Example: XY Overhead, snare, kick, toms
Audio Example: XY Overhead, snare, kick, toms
Drum Recording Assignment #5
Record a drum set using Close-Mic Technique
Use the above mic configuration. Make sure that you describe your set up.
This concludes our Logic Pro X Tutorial